"A human being should be able to change a diaper, plan an invasion, butcher a hog, conn a ship, design a building, write a sonnet, balance accounts, build a wall, set a bone, comfort the dying, take orders, give orders, cooperate, act alone, solve equations, analyze a new problem, pitch manure, program a computer, cook a tasty meal, fight efficiently, die gallantly. Specialization is for insects." (Robert A. Heinlein)
Showing posts with label Backup. Show all posts

Saturday, 30 December 2017

Backing-Up Your Data With Raspberry Pi

Among information technology bad practices not backing-up your data is the one you are going to regret more as something goes wrong. For too many years I’ve been relying solely on the good health of my disk drives, that means I was relying mostly on good luck, and on manually copying data, mostly photos and videos, on different supports. I decided so to buy myself a bigger disk drive with the sole purpose of keeping a backup copy of my data.

Hardware set-up

First things first, I bought an external 2TB USB disk. The disk size is enough to backup my 1TB NAS disk and other data I actually keep on the Raspberry Pi server or the desktop PC. More importantly the disk is externally powered since the Raspberry couldn’t power it by itself.
I formatted the , with the XDS file-system, by using the tool provided with my NAS disk, after attaching the new disk to the NAS spare USB port. This step is not strictly necessary but it will allow me, in future, to share the backup disk just by connecting it to the NAS USB port.
I then connected the backup disk to the Raspberry Pi 3 and configured the /etc/fstab file in order to mount it on start-up
/dev/sdb1 /media/backup xfs rw,defaults 0 0


Software set-up: rdiff-backup

While I was looking for a backing-up software solutions I was mostly thinking to some directory mirroring tool like RSync but, like often happens, I stumbled in a more complete solution when I did read this page describing a backup system based on Raspberry Pi and rdiff-backup.
Rdiff-backup is a command line based backup tool, it provide all basic backing-up features like differential backups or time based restore. More importantly, to me, it’s based on standards tools like Rsync directory mirroring and tar archives, meaning that archives are easily readable without the need of rdiff-backup itself.
I installed rdiff-backup with apt-get tool:
sudo apt-get install rdiff-backup

Then created some target folder in the backup drive
sudo mkdir /media/backup/public
sudo mkdir /media/backup/nas
sudo chown pi:pi /media/backup/public/
sudo chown pi:pi /media/backup/nas/

Then I manually started the initial backup, knowing the operation was going to take some time I started a independent shell session with the screen command.

screen
rdiff-backup --exclude /media/public/BTdownload /media/public/ /media/backup/public/

The backup command just needs source and destination folders path, many optional switches are available like the one I used, “--exclude”, which exclude from the backup process some sub-folder.
Once the initial backup completed successfully I used the crontab command to schedule the backup command.
crontab -e
Since most of backed-up data are photos and videos I produce during week-ends I scheduled it weekly ad Tuesday (Monday is already SD-card backup day)
0 5 * * 2 rdiff-backup --exclude /media/public/BTdownload /media/public/ /media/backup/public/

Some notes on performances


The initial backup of my photos and videos collection, about 300 GB, took most of the day to complete. The poor performance is mostly because I keep my data on a Samba share. Rdiff-backup documentation discourages backing up networked disks through in favor of the better optimized SSH protocol, unfortunately my NAS disk doesn't support this option. Not a big problem in my case anyway, because future differential backups will need less time, of course, and the backup process will be performed automatically between two always-on devices.

Monday, 2 October 2017

Backing-up the Raspberry Pi 3

Recently I had to repeat installation of my Raspberry Pi 3 server. Probably because of some SD card corruption problem I started experiencing unexpected loss of active services, first GitLab then MiniDLNA, a and failures while trying reinstalling or reconfiguring them. I so downloaded latest Raspbian image and went with a complete installation. Not a big deal, since I’ve been following my own instructions on this blog but still a time consuming process.
Once the Raspberry server was operative again I started looking for a simple backup solution in the case something broke again by itself or, not unlikely, I broke something by myself.
I quickly found in the Internet this discussion page where, among other solutions, it was proposed a handy shell script to completely backup Raspberry SD Card. Following discussion links I landed on this GitHub page where the same script is available in its latest version.
Installation
Installing the script is just matter of downloading and unzipping it or, as alternative, cloning it with git command. I did choose the latter since I’m going to need git in future.
sudo apt-get install gitmkdir scriptcd script/git clone https://github.com/aweijnitz/pi_backup.git
configuring the script
The PI backup script is a fine example of shell programming, it needs only a couple of arrangements to fit the system where is installed.
First functions stopServices() and startServices must be edited by uncommenting commands to stop and start services running on the Raspberry. I added command to stop and start MiniDLNA service:
...sudo service minidlna stop...sudo service minidlna start...
Then I edited the backup path. In the same scrip section it’s possible to set the number of old backups to keep and if backed-up images must be compressed.
...# Setting up directoriesSUBDIR=backupMOUNTPOINT=/media/usbdiskDIR=$MOUNTPOINT/$SUBDIRRETENTIONPERIOD=1 # days to keep old backupsPOSTPROCESS=0 # 1 to use a postProcessSucess function after successfull backupGZIP=0 # whether to gzip the backup or not...

Monday, 2 April 2012

Tips for (happily) backing up your i.ph blog

After talking with another i.ph blogger I tough it may be useful a short post on how I quickly backed up my i.pb blog posts. 

i.ph blog addresses

DotPH blogging platform is based on a proprietary platform called Calliope. Not a bad platform at all but a bit outdated today. Among many other problems Calliope doesn't provide it's users with any backup tool. During three years of blogging with i.ph platform I noticed that blog post can be accessed  from a dual address: one is the usual long permalink 
the other is based on the post number
http://musante.i.ph/blogs/musante/?p=119
My backup solution

 Once i received the news about i.ph closing its free blogging service I looked for a program able to sweep all my post addresses and automatically downloading at least the page HTML. I discovered I could use a very flexible Firefox plug-in: DownThemAll
DownThemAll is a  plug-ins that works as a download manager for Firefox, among the many features it also allow to start a batch download of numbered items. Just what I needed!
All I had to do has been open the DownTemAll manager window and start a new download process (the plus button). I then configured the download process as shown in the screen-shot (sorry I only have an Italian screen-shot).


the numbers between square brackets are the start and end number post you're going to download while the pattern on the bottom (*url*-*inum*.*ext*) tells DownTemAll hot to name the downloaded files (musante.i.ph-001.htm and so on).

Some final notes

DotPH support promised an easy way to backup our blog content, I'm sure they'll come out soon with such solution but, since restoring a blog is a long work, better to start early.
My method only saves the page HTML file not images or any thing you may have linked in it. this is fine if you have your images hosted on another server (like, for example, fickr). If you have your images hosted on i.ph you'll have to save them separately. 
The hard, and boring, part comes with restoring your backed up posts. I'm doing it manually but I have only 117 post to restore on my new blog. If you have more It might be worth looking for an automated way of doing it.

I hope this can be useful. If you have any question, or suggestion, feel free of course to comment here.

Tuesday, 10 January 2012

Backing up the EEEPC with SystemRescueCd

I'm going to upgrade my EEEPC Linux installation, at last. Before doing any big operating system change It's a good practice to make a full backup of the system partition. Just in case something goes wrong and you want back your old working system. Dedicated Linux distributions are the ideal solution for partition backup and recovery since they let you easily recover even from a non-starting system situation. Last time I backed up my system partition, when I switched from Xandros to EEEBuntu I used Clonezilla. This time I decided to use a more flexible distribution: SystemRescueCd.

Installation


Like its name may suggest SystemRescueCd is a small Linux distribution specifically designed for disk recovery tasks, and it's provided with some invaluable (life saving) tools like GParted or Partimage. I downloaded SystemRescueCd ISO image from its download page then prepared a bootable USB disk following the site how-to.
First I mounted the ISO image
sudo mount -o loop,exec ./SystemRescueCd-x86-2.4.0.iso /tmp/sysrescd/
then I started the USB installation script from the mounted ISO image
cd /tmp/sysrescd/
sudo ./usb_inst.sh
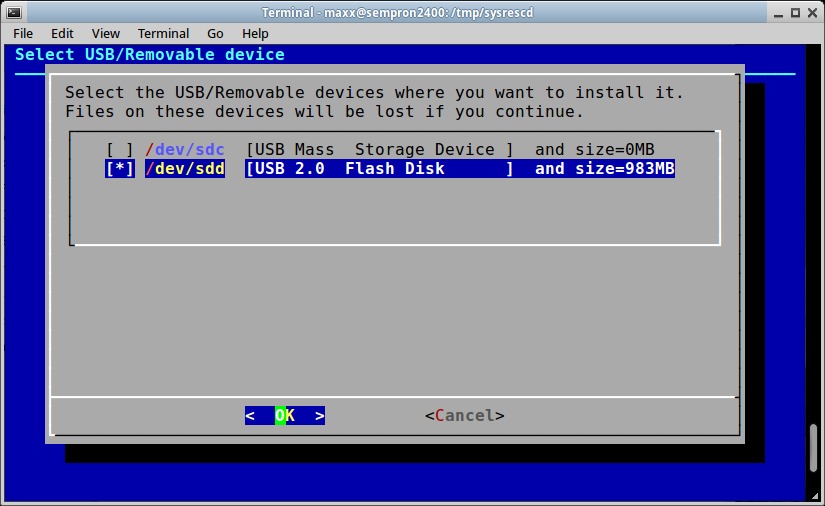
a simple but effective interface shows-up there I selected the USB disk device and let the installation start.

It may happen that the Installation interface shows your device with a 0MB disk size and then exits with an error message when you try to install. This can be easily solved (thanks to this forum post) by manually unmounting your device using the console command.
umount /dev/sdd1

Monday, 2 February 2009

Backing-up the EEEPC with Clonezilla


I'm going to install EEEBuntu to but first I decided to back-up my current installation. I decided to use Clonezilla, the 'live' distribution, mainly because it promised to be a clean and fast tool.
I used one 1GB USB pen drive as boot device and an external 250GB USB hard drive as backup device.
I first downloaded Clonezilla, the zip format distribution, (from here) and uncompressed it to my USB pen drive. Then, following instructions from Clonezilla site,  I made my USB drive bootable using Live USB Helper.
I then started my EEEPC from the usb drive, by pressing  ESC key at boot time and choosing the pen drive from the boot menu.
I proceeced with backup operation following Clonezilla site instructions (here). No screenshots, sorry, but there is no real difference between what I did and screenshots published in Clonezilla how to pagesThe only real difference is the disk naming: on the EEEPC internal disks are usually named "sda" and "sdb" while external disk names may change (in this case it was "sdc").
Here are my selections, in the order they appeared:
  • "Clonezilla Live (Default settings, VGA 800x600)" in boot menu options
  • Language: "English" (Italian is also available)
  • Keymap: first 'qwerty' then 'italian' and 'standard'
  • "Start_Clonezilla" option
  • Mode: "device-image" to backup source diskto an image fale in destination disk
  • Mode: "local_dev" to select a local device (the usb external drive) as target device
  • Destination device: "sdc1" this is the name given to my external drive and mounted by Clonezilla as "/home/partimag"
  • Backup directory: "Top_directory_in_the_local_device"
  • Mode: "savedisk" to save the whole EEEPC disk to an image
  • Image name: "2009-02-05-23-img" the default name
  • Source disks: "sda" and "sdb"
  • Clone programs priority: "-q : ntfsclone > partimage > dd
  • Advanced extra parameters: none changed from default
  • Compression: "-z1 Use gzip compression"
  • Split size: "0" EEEPC (disks are small so why to split the image?)
  • Action after cloning: "true do nothing"
In conclusion I think Clonezilla is really a valuable fast and clean tool. It took only 15 minutes to backup my EEEPC disks (not very full indeed) to an image a little bigger than 3GB. Clonezilla interface may seem a little primitive but, while using it, I never felt the need of a more complex one. So I, definitely, have no escuses for not to backup my system at least before any major upgrade.